I’ve built my personal website three times. Each rewrite wasn’t because the previous version broke — it was because my understanding of “how a website should exist” had shifted. Three rounds in, the lesson is clear: picking tools is the easy part. The hard part is building a workflow that makes writing content feel light.
| Version | Stack | Positioning | What got stuck |
|---|---|---|---|
| v1 | Bootstrap single-page static site | Resume link | Content tangled with structure — changing the layout meant touching every card |
| v2 | Python script generating HTML | Portfolio | Templates were painful to change; image compression, routing, and SEO all had to be hand-rolled |
| v3 | Astro + React (current) | An ongoing content platform | — |
The shift in v3 wasn’t really a tool change — it was repositioning the site from “single-page calling card with my work” to “platform for accumulating content over time.” The priority became — how do I make the act of writing content lightweight enough. This post unpacks that whole flow, from setup to deployment to domain to day-to-day content management, with a focus on how I use Claude Code to keep daily maintenance close to zero.
Setup: Stack Choice, Repo, and Initialization
I picked Astro because it sits at the intersection of “content-driven” and “component-based” — content goes in MDX, the static parts compile to plain HTML, and the genuinely interactive bits become React islands embedded inside.
When I was choosing the framework, I had four hard requirements:
- Easy to deploy to a static platform (especially Cloudflare, since my domains and DNS already live there)
- No need for SSR, no need for an API server
- Can mix in React components for interactivity
- Content can be written in MDX
I compared Next.js (too feature-heavy, SSR-centric, didn’t want to be locked into Vercel), Hugo (no MDX support — custom components have to use Shortcodes), and Nuxt (I’m not fluent in Vue). Astro was the only one that hit all four.
With the framework decided, the next three steps set up the project’s “home” before we get to deployment.
Create a New Repo on GitHub
I always start by opening an empty repo on GitHub — it gives the project a remote home, and every piece of automation downstream hangs off of it. From your GitHub profile, click ① New in the top-right corner:
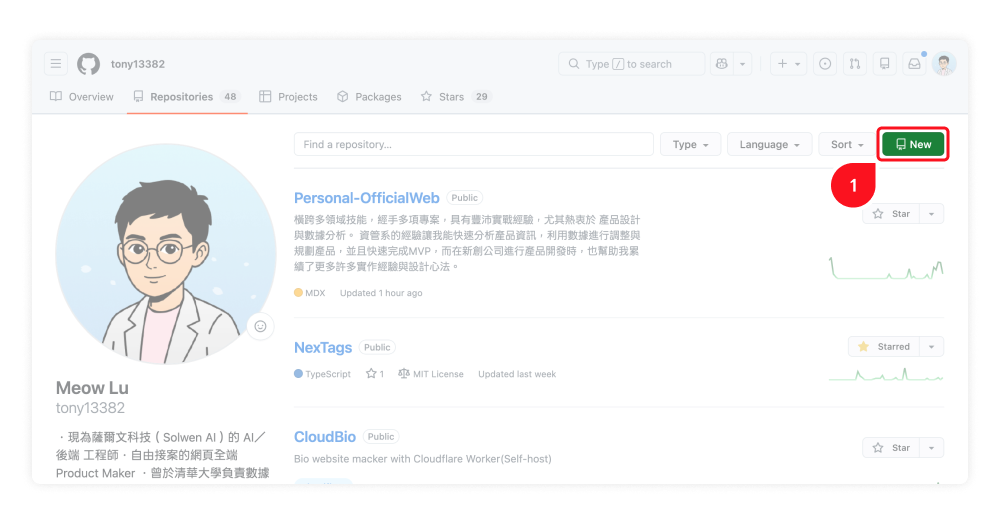
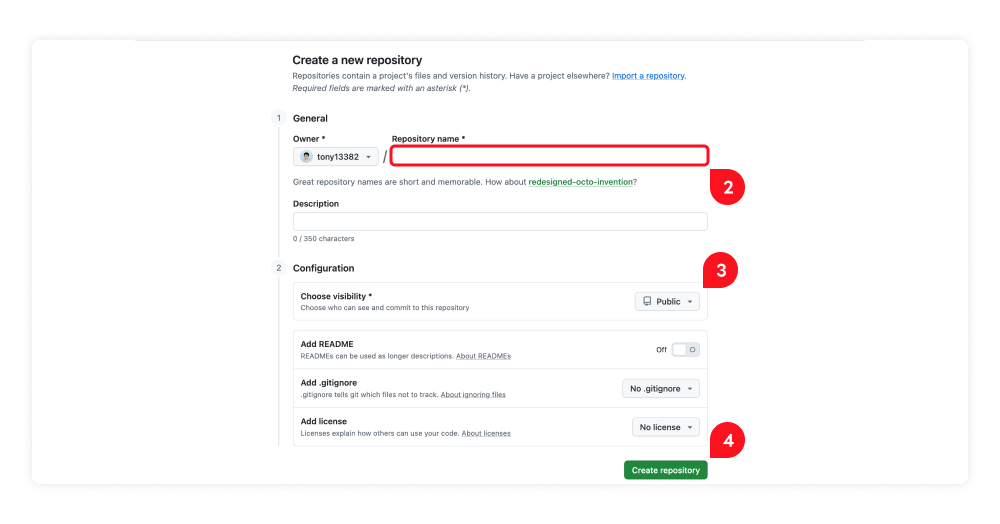
Then fill out the form:
- ② Repository name: Just match it to what the site is. This one is
Personal-OfficialWeb. Don’t waste time inventing a clever code name - ③ Choose visibility: Public or Private both work — depends on whether you want to share the source code. I went Public so the code can double as part of my résumé; if you only need the repo for deployment and don’t plan to show it off, Private is completely fine
- Leave README,
.gitignore, and license unchecked — Astro’s initializer will generate them - ④ When everything looks right, click Create repository
Clone to Local
Once the repo exists, clone it locally — this local copy becomes your working directory for all development from here on:
git clone [email protected]:your-username/your-repo.git
cd your-repo
Initialize Astro
Inside the cloned directory, run Astro’s official wizard:
npm create astro@latest .The wizard walks you through TypeScript, sample templates, git init, and so on — pick what fits. I went with TypeScript Strict, an empty template (I prefer to assemble it myself), and skipped git init since the repo is already cloned. Once it finishes, the directory structure is in place and npm run dev will spin up the dev server right away.
Talk to Claude Code About Pages and Data Shape
After init, I don’t immediately start writing schemas. I open Claude Code and talk through what the site should look like. The conversation centers on three things:
- What pages do I need: home, articles, projects, jobs, about — sketch the information architecture first
- What does each page do: list views? detail pages? filtering? interactive components?
- What does the content look like: frequently updated or stable? bilingual? any special fields (
pin,updatedDate,cover)?
Get clarity on those first, and the schema designs itself to fit. If you jump straight into writing schema, you almost always miss fields and end up doing a “oh I forgot pin and updatedDate” pass later — wasted time.
The advantage of talking it through with Claude Code is that it actively asks the questions I’d skip — “should this field be optional?”, “do you need bilingual support?”, “how should the list page sort?” — basically a free reviewer helping me clean up the IA.
Set Up Content Collections Schema
Once pages and data shape are clear, you can write the schema. Astro’s Content Collections is one of the features that made me stay — every collection has a Zod schema, and if a field is missing or wrong while writing MDX, the IDE flags it before build. Here’s the articles collection:
src/content/config.ts
const articlesCollection = defineCollection({
  type: 'content',
  schema: z.object({
    title: z.string(),
    description: z.string(),
    date: z.coerce.date(),
    category: z.string(),
    tags: z.array(z.string()).default([]),
    pin: z.boolean().default(false),
    cover: z.string().optional(),
  })
})
If date becomes 2024-13-40 (a non-existent date) or category is missing, astro dev complains immediately. Compared to my v2 Python generator — where you had to wait for the script to finish running before you’d even know a field was wrong — Astro catches it at write time.
Styling-wise I pair Tailwind CSS v4 with shadcn/ui, with components written as React islands. Day-to-day maintenance of that layer goes to Claude Code — there’s a dedicated section on that further down.
Automated Deployment: Cloudflare Workers Wired to GitHub
The first two versions ran on GitHub Pages. I switched to Cloudflare for v3 mainly because:
- The Workers ecosystem (D1, KV, R2, Durable Objects) means resources are right there if I ever want to add dynamic features
- The domain was already on Cloudflare — binding a custom domain is a click in the same dashboard, HTTPS auto-provisioned
- More edge nodes — latency from Taiwan is noticeably better than Vercel or Netlify
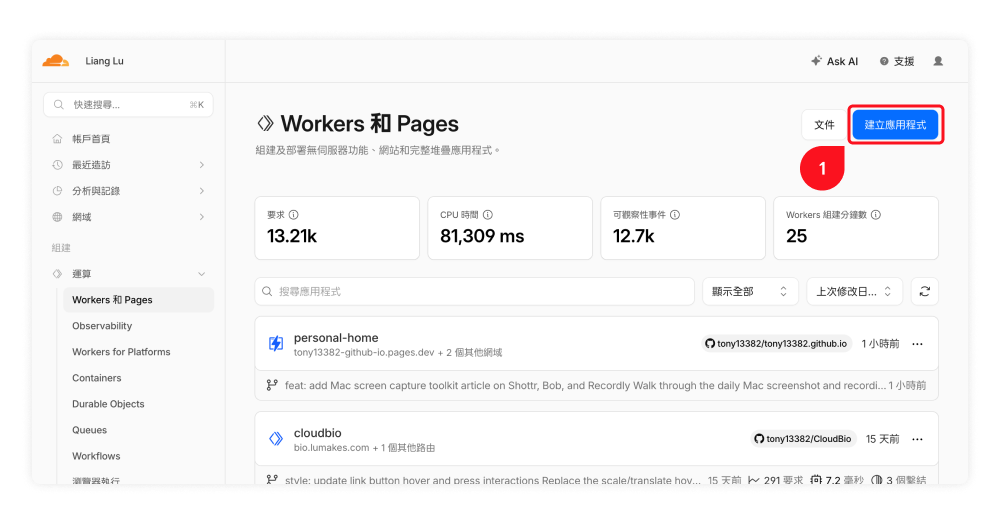
Cloudflare has folded Pages into a unified “Workers & Pages” surface. Creating a new application is four steps:
1. Go to Workers & Pages and create a new application: From the left nav, go to “Compute → Workers & Pages”, and click ① Create application in the top-right.
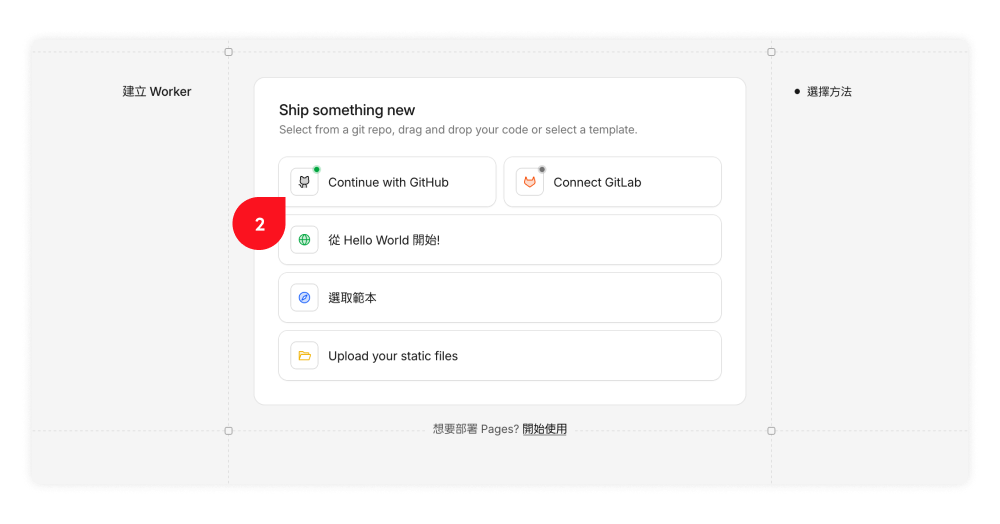
2. Pick a method: From the “Ship something new” panel, choose ② Continue with GitHub and authorize Cloudflare to read your repo list.
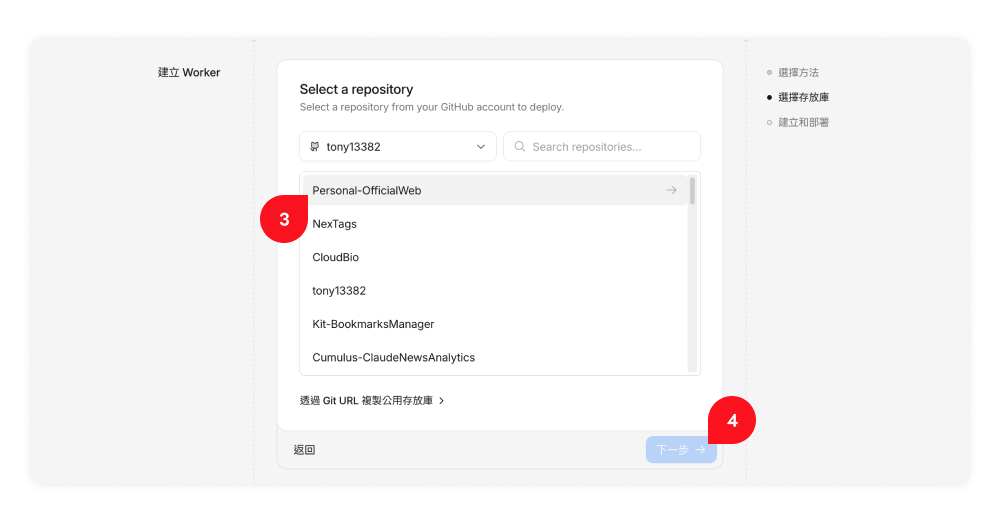
3. Pick a repo: Choose your GitHub account from the dropdown, ③ select the repo you just created (Personal-OfficialWeb), and ④ click Next.
4. Fill in build and deploy commands: ⑤ Set the build command to npm run build and the deploy command to npx wrangler deploy (the unified Workers flow). ⑥ Click Deploy and the first build runs in seconds.
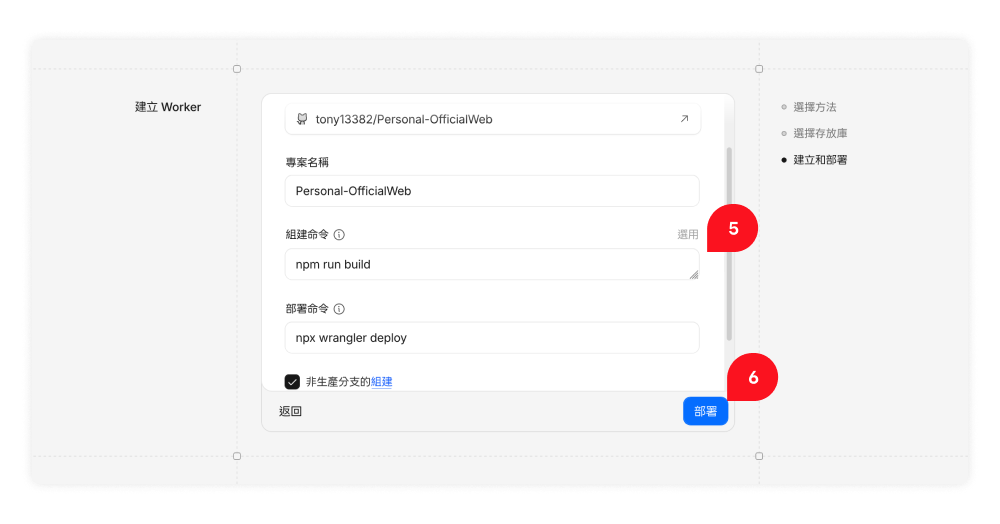
Once it’s wired up, pushing to main triggers a build and an edge deploy automatically — the whole thing takes one to two minutes. No staging, no preview flow, because this is just my own site. If something’s broken I just fix it and push again.
Domains: Buy on the Same Platform, Name for the Long Run
I register my domains through Cloudflare Registrar. The reason is the “at-cost” pricing model — they charge what the registry charges, no first-year discount that doubles on renewal, and WHOIS privacy is built in for free. The other registrars I looked at (GoDaddy, Namecheap) all had renewal hikes, cluttered UIs, and aggressive upsells.
A few naming principles I follow:
- Easy to say, easy to spell — don’t make people second-guess the spelling
- Don’t bake your job or domain into it:
xxx-designer.combecomes awkward if you change careers - Pick a clean TLD (
.com/.me/.dev), don’t chase trendy ones - Keep it short, avoid hyphens
Experimental side projects go on subdomains (app.lumakes.com, lab.lumakes.com) — the main site is the identity, subdomains are the experiments. One brand tree is enough to maintain.
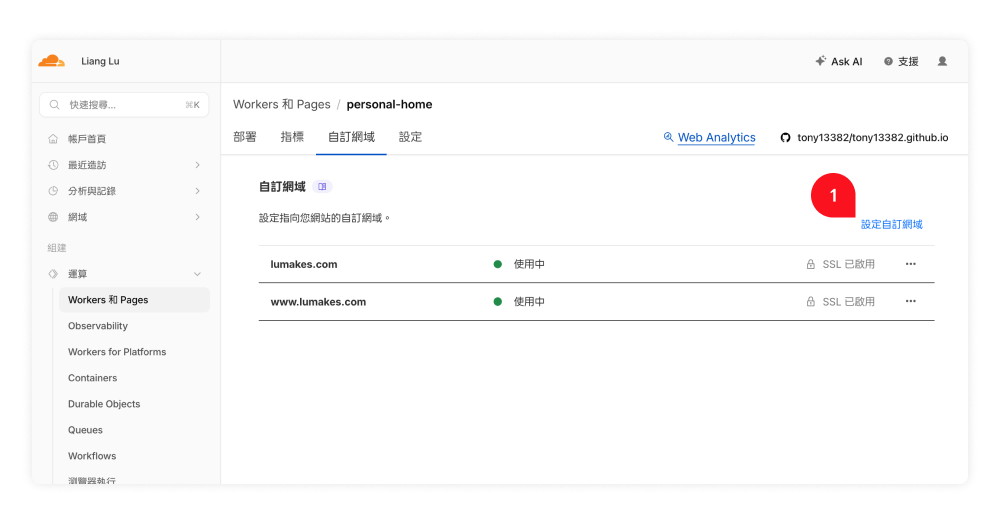
Back to deployment — once you have the domain, bind it back to the Workers Platform. In your project’s “Custom domains” tab, ① click Set up a custom domain in the top-right:
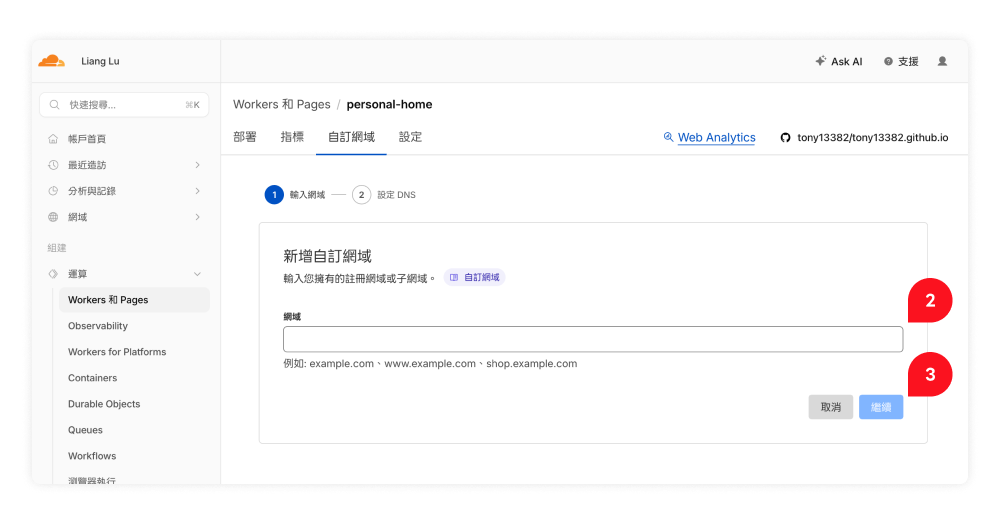
Then ② enter the domain (example.com, www.example.com, shop.example.com — anything works) and ③ click “Continue”. If the domain is already on Cloudflare, the DNS record gets written automatically; if not, Cloudflare hands you a CNAME to add to your external DNS. HTTPS certificates are handled by Cloudflare — no need to touch Let’s Encrypt.
Workspace: Four Corners, One App Each
Once the site is up, the rest is just looping “write, preview, edit, preview again.” If those four actions live in the same window stack, things pile up — every time I need to find something I lose a few seconds picking the right window. After v3 launched, I tiled my screen into a 2×2 grid and pinned one app to each corner. A glance gets me there — no switching, no hunting.
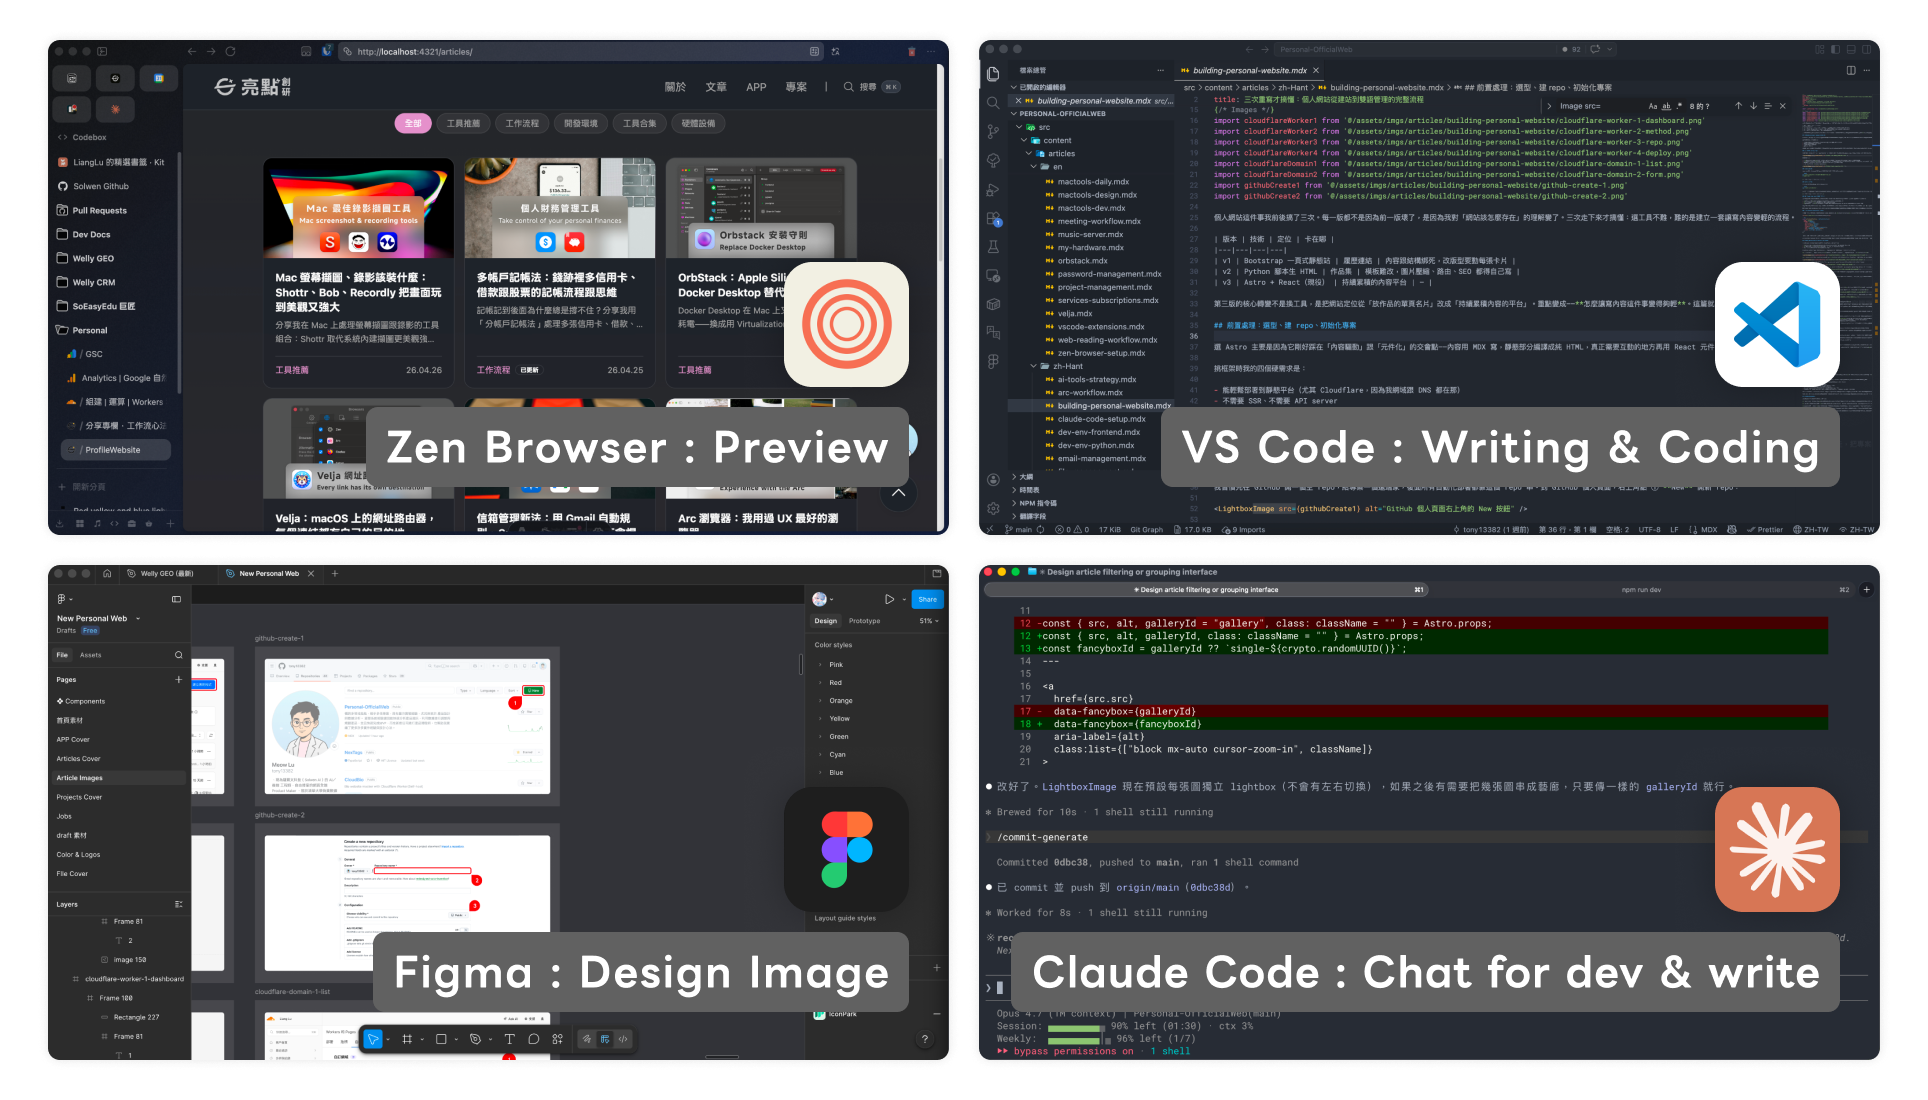
Each corner maps to one action:
- Top-left · Zen Browser: (Preview) Dedicated to
localhost:4321for the local preview. Zen has Workspaces and sidebar tab groups that Chrome and Safari don’t — so when I duck out to look something up, the preview tab doesn’t get buried - Top-right · VS Code: (Writing & Coding) MDX articles and Astro / React code both live here. MDX preview, Tailwind hints, and Git are all in the same window
- Bottom-left · Figma: (Design Image) Article hero images, app covers, and social graphics all get laid out in Figma. One file holds all the assets — I just export whichever frame I need
- Bottom-right · Claude Code: (Chat for dev & write) A standalone terminal running Claude Code — questions, style tweaks,
/new-article,/translate-article, all here. I use Ghostty, but any terminal works; I keep it out of VS Code’s built-in terminal because that one has rendering glitches under heavy output — Chinese characters in particular often come out as mojibake
The benefit isn’t just visual tidiness — it’s that a glance gets me there. Write a line of code, look up at the top-left preview, look back to the top-right and keep editing — my brain never has to decide “which window do I open,” and my hands don’t have to switch. Writing and watching live in the same view, so the reflex loop closes immediately.
Styling: Outsourced to Claude Code
The split that ended up feeling most natural in this version is — Claude Code handles styling and structure, I handle content myself.
Styling is exactly where Claude Code shines. It can read the entire project context in one pass and understand that I’m using Tailwind v4 (not v3), where the shadcn/ui components live, how the theme variables are defined. The consistency it produces is actually steadier than what I’d manage by hand.
The key is writing a good CLAUDE.md. I keep one in the project root that covers the tech stack, folder structure, styling rules, common pitfalls, and the bilingual writing flow. Every new session, Claude knows what this project is the moment it boots — no need to re-explain. I wrote up the deeper details in Claude Code Setup Notes, so I won’t repeat them here.
Content Workflow: From Idea to Bilingual Publish
With styling outsourced, what’s left — “what to write”, “how to write it”, “did I get it right” — has to come from me. But that doesn’t mean every article starts from zero with Claude. I split this side into five steps, and at each step I codify the repeatable parts:
① Idea Capture: Speed Over Polish
The first step is just catching the thought. At this stage I optimize for speed, not precision — if an idea hits, I write it down immediately, messy formatting and typos and all. The tools I use are the kind you can open and start writing in instantly:
- Apple Notes: Built into macOS and iOS, syncs over iCloud, zero setup (free)
- Bear: Clean interface, native Markdown, equally good for short notes and long outlines (free to use, paid subscription for advanced features)
- SimpleNote: Ultralight plain-text notes, opens fast, syncs across platforms (free)
What these three share is zero friction — the worst enemy of capturing ideas is the “I should organize this” instinct. The moment you start deciding “which folder does this note belong in”, you stall, and the thought goes cold.
② Outline Planning: Frame the Skeleton with Claude First
For every new article, I start by talking through three things with Claude — topic, slug, and H2 structure. Once those are locked, the skeleton is set and the rest is filling in flesh.
This step looks trivial but it matters — it forces vague ideas into concrete section breaks, so I don’t end up writing for two hours and then realizing the structure is wrong and the whole thing needs reorganizing. The conversation usually goes through a few rounds of “is this section too granular?” or “do these two H2s overlap?” before things settle.
③ Drafting and Assets: MDX + the new-article Skill
Once the skeleton is in place, I just open the .mdx file and write. Articles are single files in src/content/articles/zh-Hant/, versioned in Git, with no headless CMS attached — for a one-person site, a CMS is overhead. MDX is lighter for everything I need.
I packaged the “actually writing” part into a custom skill called new-article. The skill encodes the three article archetypes (tool-recommendation, methodology, experience-sharing), how to structure each one, what the special components look like (pricing tag, callout, code title), and the SOP order. So when I type /new-article, Claude enters “article-writing mode” and follows the same playbook every time.
Once that layer is SOP’d, every output has the same format, and I never have to re-explain the rules per article.
④ Review and the Brand Intent MD
I don’t publish the moment a draft is done — I go back and forth with Claude to polish it: rhythm, paragraph order, word precision. But “polishing” means nothing if the standard drifts every session. The voice would wander.
So I added one more piece: I wrote my voice preferences, word choices, and opening structure rules into a standalone file called BRAND_VOICE.md at the project root. CLAUDE.md and all my skills (including new-article and the translate-article skill below) reference it, giving “what I want my articles to sound like” a single source of truth.
The structure looks roughly like this:
BRAND_VOICE.md (excerpt)
## Writing Voice
- First-person, casual, like sharing experience with a friend
- No emoji
- Use sentence-case headings, not Title Case
- Natural sentence endings — avoid stiff or formal copy

## Word Preferences
- Avoid dated slang — pick precise words instead
- Always show the reasoning behind a choice ("I had A and B running, so...")

## Article Opening Pattern
- Pain points listed up front must align on the same dimension (one root cause explains them all)
- The first H2 must establish the underlying logic
- Name your principles (e.g., "plan first, then write") so readers can remember them
When I’m reviewing an article, I ask Claude to cross-check it against this file and flag anything that doesn’t match. Once the rules live in a file, the standard is consistent every session — I never have to re-explain “I prefer to write this way”.
⑤ Bilingual Translation: the translate-article Skill
I only move to the English version after the Chinese version is locked. This rule matters — if you start the English version while the Chinese is still in flux, you’ve signed up for double maintenance and iteration slows down.
Once Chinese is locked, I run the translate-article skill on the English version. The skill includes:
- Find the corresponding Chinese MDX, create the English file with the same slug
- Translate the frontmatter (with fixed mapping tables for category and tags)
- Preserve imports, images, and internal link paths (shared between languages)
- Cross-language tables for special components (pricing tag, official-link, callout)
- Match the voice in
BRAND_VOICE.mdduring translation — no translation tells, keep first-person, use em dashes to mirror the Chinese——
The whole flow is /translate-article plus a slug. Claude runs the playbook end to end and finishes by running a build to confirm page count went up by one. The few things that need my input are passages where the Chinese and English diverge enough to require a judgment call — the skill surfaces those at the end for me to confirm.
Before this was a skill, I’d re-explain the rules every translation (no translation tells, preserve class variants, don’t touch internal links). After packaging — those rules become Claude’s defaults. That’s the real value of a skill — it freezes a repeated judgment so it doesn’t have to be re-made.
What Three Rewrites Taught Me
Distilled from this whole flow, a few takeaways:
1. Positioning decides everything, not tools. The pivot points across all three rewrites weren’t “the old tools broke” — they were “my idea of what this site is changed”. Decide what the site means to you first; pick the tools after.
2. Repeatability requires fixing rules in files. BRAND_VOICE.md, the new-article skill, the translate-article skill — all three follow the same logic: take the judgment calls that come up every session and write them down so the next session doesn’t start from zero.
3. Don’t rebuild infrastructure. In v2 I burned a lot of time hand-rolling image processing, routing, SEO — things Astro has built in. Custom infrastructure looks like freedom; in practice every piece eats away at your energy for actually writing.
4. A small site deserves a small site’s rhythm. No staging, no preview flow, push to main and ship. Over-engineering eventually makes you not want to write — and this site exists to accumulate content, not to show off architecture.
This version, I think I can use for a long time. The thing that used to get stuck wasn’t the tech — it was my understanding of “how a website should exist”. The current setup is enough to support the act of “keep writing”; the rest is just doing it consistently.