
The first time many people use Claude Code, they treat it like a smarter programming chat window: send a request, wait for edits, then follow up when something breaks. After using it for a while, I realized the real bottleneck is not how smart a single answer is. It is whether the whole environment helps Claude Code understand the project, track state, and repeat common workflows reliably.
My conclusion is that for Claude Code to become a stable AI engineer workflow, you cannot rely on the model alone. You need to build the foundation around it: Status Line, CLAUDE.md, and custom Skills. This will be a living setup note where I keep adding settings and techniques I think are worth sharing.
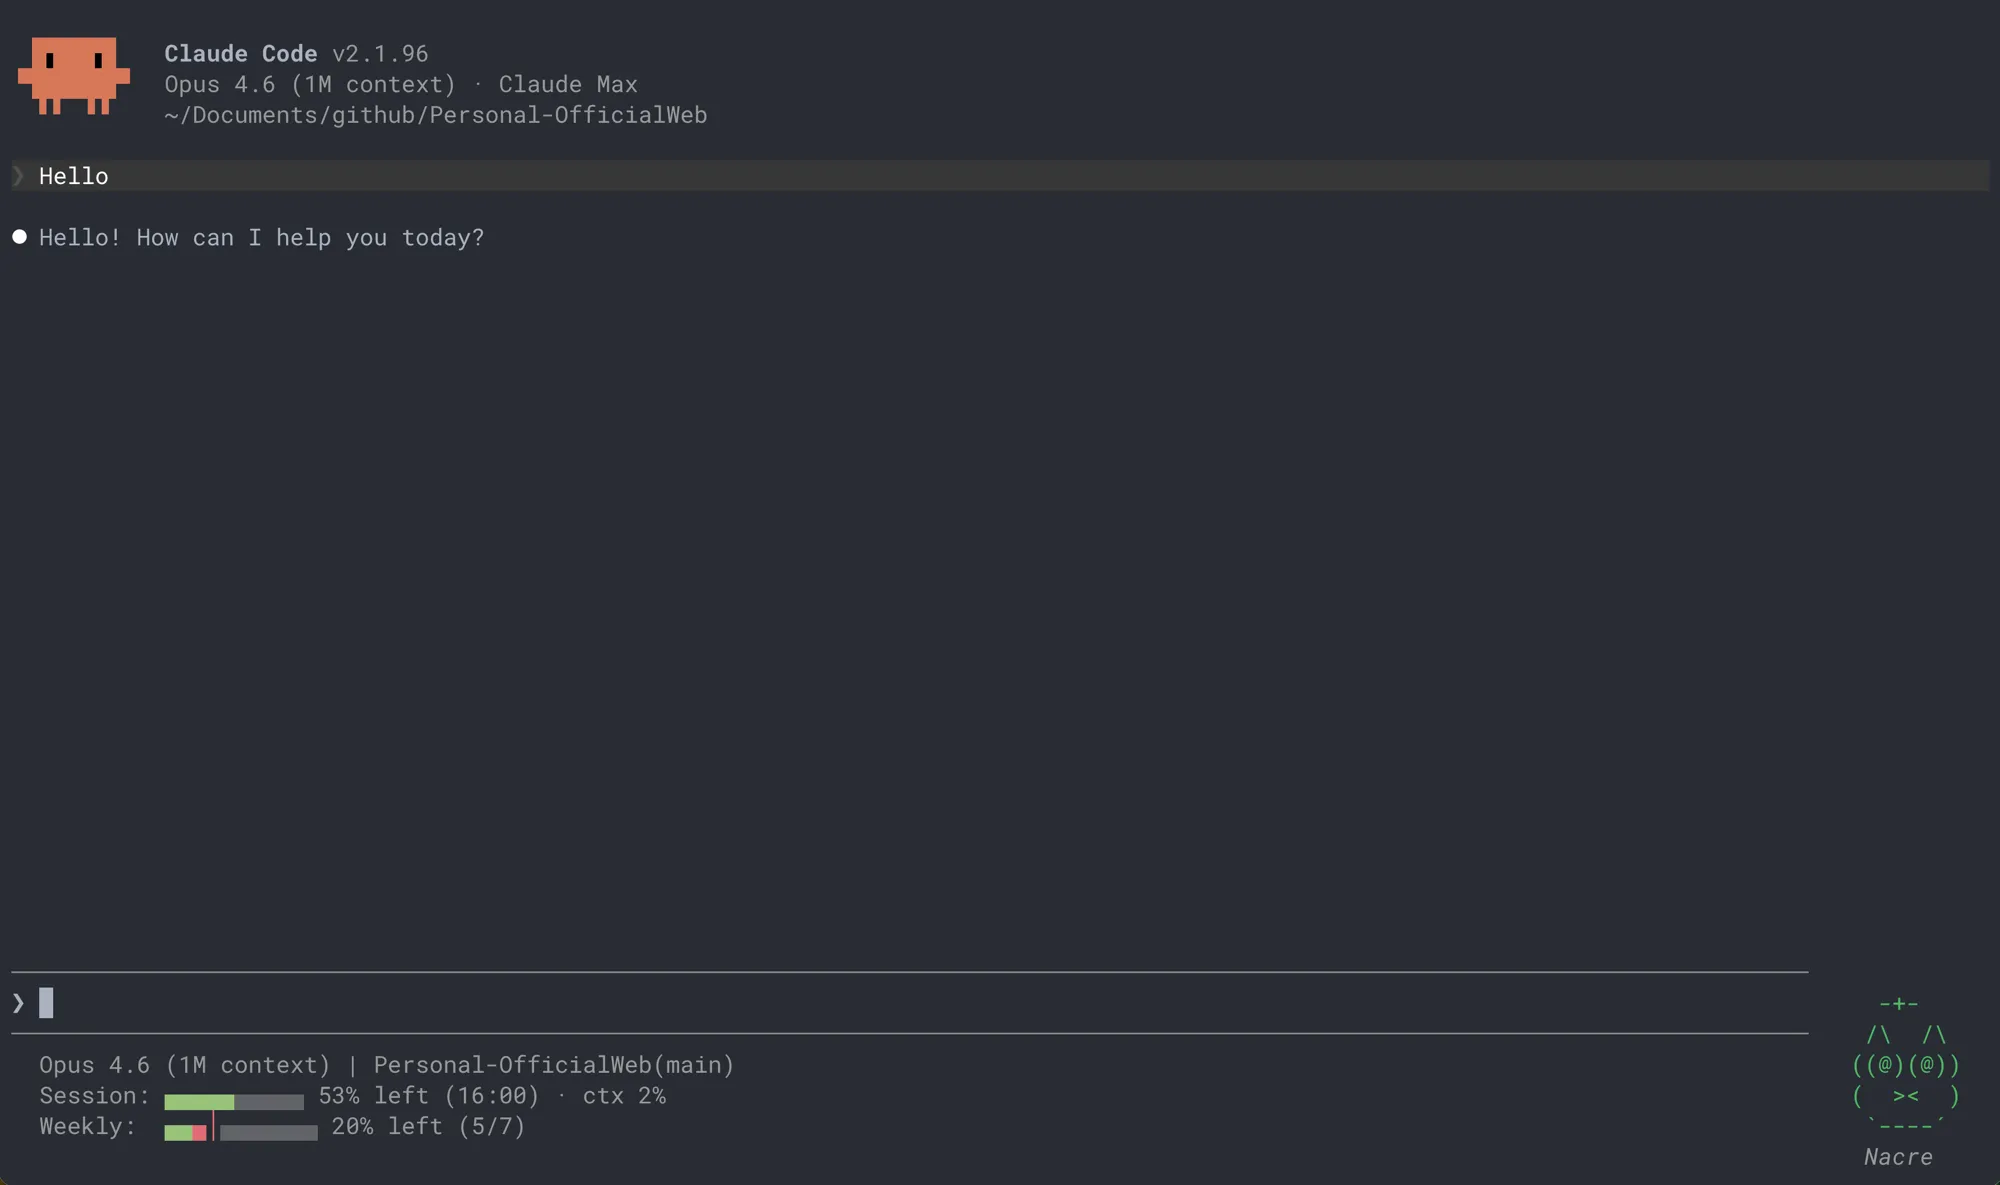
Here’s what my current Claude Code setup looks like: three lines at the bottom showing model, project branch, session/weekly usage remaining, and context window — in real time. The block character indicators make it readable at a glance, and if the weekly usage goes over pace, it automatically turns red. This is just one of the configurations — I’ll break down each one below.
Core Logic: Turn Claude Code into a Working Environment
The most underrated thing about Claude Code is that it is not just a Q&A tool. It is a configurable development environment. When the environment is messy, every conversation feels like the AI is rediscovering the project from scratch. When the environment is set up well, it can consistently follow your rules, file structure, and working preferences.
I think of the setup in three layers. The first layer is status visibility: knowing the current model, context window, and usage limits. The second layer is project instructions, so the AI reads the repo’s rules whenever it enters the project. The third layer is reusable Skills, turning repeated workflows into stable capabilities instead of long prompts you have to rewrite every time.
These layers are not decorative settings. They are what turn an AI dev tool from “occasionally impressive” into something I can rely on every day.
Status Line: Real-Time Usage at a Glance
Claude Code has a Status Line at the bottom that’s disabled by default. Once enabled, it periodically sends the current state to a script you specify as JSON. The script processes it and outputs text, which appears at the bottom of the screen.
The full setup is three steps: write the script, give it permissions, update the config file.
Creating the Script
First, create a statusline.sh under ~/.claude/:
~/.claude/statusline.sh
#!/usr/bin/env bash
input=$(cat)

RESET="\033[0m"
RED="\033[31m"
DIM="\033[2m"
GREEN="\033[32m"

# Helper: print absolute reset time (e.g. "14:30")
format_reset() {
  date -r "$1" "+%H:%M" 2>/dev/null || date -d "@$1" "+%H:%M" 2>/dev/null
}

# Session bar: green ▄ = remaining, dim ▄ = used
session_bar() {
  local remain=$1 total=$2 bar="" i
  for (( i=0; i<total; i++ )); do
    if [ "$i" -lt "$remain" ]; then
      bar="${bar}${GREEN}▄${RESET}"
    else
      bar="${bar}${DIM}▄${RESET}"
    fi
  done
  printf "%s" "$bar"
}

# Weekly bar: green ▄ = remaining, │ = pace line, dim ▄ = used
# Over-pace: ▄ between remain and │ turns red
weekly_bar() {
  local remain=$1 pace=$2 total=$3 bar="" i
  local over=0
  [ "$remain" -lt "$pace" ] && over=1
  for (( i=0; i<total; i++ )); do
    if [ "$i" -eq "$pace" ]; then
      [ "$over" -eq 1 ] && bar="${bar}${RED}│${RESET}" || bar="${bar}│"
    elif [ "$i" -lt "$remain" ]; then
      bar="${bar}${GREEN}▄${RESET}"
    else
      if [ "$over" -eq 1 ] && [ "$i" -lt "$pace" ]; then
        bar="${bar}${RED}▄${RESET}"
      else
        bar="${bar}${DIM}▄${RESET}"
      fi
    fi
  done
  printf "%s" "$bar"
}

# Data extraction
model=$(echo "$input" | jq -r '.model.display_name // empty')
cwd=$(echo "$input" | jq -r '.cwd // empty')
branch=$(git --git-dir="$cwd/.git" --work-tree="$cwd" branch --show-current 2>/dev/null)
[ -n "$cwd" ] && project=$(basename "$cwd")

five_pct=$(echo "$input" | jq -r '.rate_limits.five_hour.used_percentage // empty')
five_rst=$(echo "$input" | jq -r '.rate_limits.five_hour.resets_at // empty')
week_pct=$(echo "$input" | jq -r '.rate_limits.seven_day.used_percentage // empty')
week_rst=$(echo "$input" | jq -r '.rate_limits.seven_day.resets_at // empty')
ctx_pct=$(echo "$input" | jq -r '.context_window.used_percentage // empty')
BAR_W=10

# Line 1: Model | Folder(branch)
line1=""
[ -n "$model" ] && line1="$model"
if [ -n "$project" ]; then
  proj="$project"
  [ -n "$branch" ] && proj="$proj($branch)"
  [ -n "$line1" ] && line1="$line1 | $proj" || line1="$proj"
fi

# Line 2: Session ▄▄▄▄▄▄▄▄▄▄ 54% left (14:30) · ctx 12%
line2=""
if [ -n "$five_pct" ]; then
  pct_int=$(printf '%.0f' "$five_pct")
  remain=$(( 100 - pct_int ))
  [ "$remain" -lt 0 ] && remain=0
  remain_count=$(( (remain * BAR_W + 50) / 100 ))
  [ "$remain_count" -gt "$BAR_W" ] && remain_count=$BAR_W
  bar=$(session_bar "$remain_count" "$BAR_W")
  reset_str=""
  [ -n "$five_rst" ] && reset_str=" ($(format_reset "$five_rst"))"
  line2=$(printf "Session: %s %d%% left%s" "$bar" "$remain" "$reset_str")
  if [ -n "$ctx_pct" ]; then
    ctx_int=$(printf '%.0f' "$ctx_pct")
    line2="$line2 · ctx ${ctx_int}%"
  fi
fi

# Line 3: Weekly ▄▄│▄▄▄▄▄▄▄▄ 21% left (5/7)
line3=""
if [ -n "$week_pct" ]; then
  week_pct_int=$(printf '%.0f' "$week_pct")
  week_remain=$(( 100 - week_pct_int ))
  [ "$week_remain" -lt 0 ] && week_remain=0
  remain_count=$(( (week_remain * BAR_W + 50) / 100 ))
  [ "$remain_count" -gt "$BAR_W" ] && remain_count=$BAR_W
  now=$(date +%s)
  if [ -n "$week_rst" ]; then
    window_start=$(( week_rst - 7 * 86400 ))
    elapsed=$(( now - window_start ))
    window_len=$(( week_rst - window_start ))
    [ "$window_len" -gt 0 ] && time_pct=$(( elapsed * 100 / window_len )) || time_pct=0
    day_in_window=$(( elapsed / 86400 + 1 ))
    [ "$day_in_window" -gt 7 ] && day_in_window=7
    [ "$day_in_window" -lt 1 ] && day_in_window=1
  else
    dow=$(date +%u)
    time_pct=$(( (dow - 1) * 100 / 7 ))
    day_in_window=$dow
  fi
  [ "$time_pct" -lt 0 ] && time_pct=0
  [ "$time_pct" -gt 100 ] && time_pct=100
  pace_remain=$(( 100 - time_pct ))
  pace_pos=$(( (pace_remain * BAR_W + 50) / 100 ))
  [ "$pace_pos" -ge "$BAR_W" ] && pace_pos=$(( BAR_W - 1 ))
  [ "$pace_pos" -lt 0 ] && pace_pos=0
  bar=$(weekly_bar "$remain_count" "$pace_pos" $(( BAR_W + 1 )))
  line3=$(printf "Weekly:  %s %d%% left (%d/7)" "$bar" "$week_remain" "$day_in_window")
fi

# Output
output=""
append() { [ -n "$output" ] && output="$output\n$1" || output="$1"; }
[ -n "$line1" ] && append "$line1"
[ -n "$line2" ] && append "$line2"
[ -n "$line3" ] && append "$line3"
[ -n "$output" ] && printf "%b" "$output"
The progress bars use half-height blocks ▄ that only occupy the bottom half of a row, so they don’t crowd together vertically. Green ▄ means remaining, dim ▄ means used, and │ is the daily average pace line. The script outputs three lines:
- Line 1: Model name, project folder, and Git branch
- Line 2: Session usage remaining — progress bar from left (remaining, green) to right (used, dim), with the next reset time in parentheses and context window usage percentage at the end
- Line 3: Weekly usage remaining — progress bar with a pace line
│in the middle marking your daily average budget. Under normal conditions, usage shouldn’t exceed the│; once it does, the overrun blocks and the│turn red — immediately obvious when you’re going over pace
Enabling the Configuration
Give the script execute permissions, then add the configuration to ~/.claude/settings.json:
chmod +x ~/.claude/statusline.sh~/.claude/settings.json
{
  "statusLine": {
    "type": "command",
    "command": "bash ~/.claude/statusline.sh",
    "padding": 0
  }
}
Setting padding to 0 makes the Status Line more compact. Restart Claude Code after saving and it takes effect.
The Quick Way
If you don’t want to create the files manually, just paste this into Claude Code and it’ll handle everything:
Help me set up the Claude Code Status Line. Create ~/.claude/statusline.sh and add the statusLine configuration to ~/.claude/settings.json.

Requirements:
- Line 1: Model name | folder(branch)
- Line 2: Session usage remaining, draw a progress bar using half-height blocks ▄ (green=remaining on left, dim=used on right), show next reset time in parentheses (HH:MM format), and context window usage percentage at the end
- Line 3: Weekly usage remaining, also use half-height blocks ▄, add a │ pace line in the middle marking the daily average budget position, turn overrun blocks and the │ red when usage exceeds the pace line, show current day in parentheses (e.g. 4/7)
CLAUDE.md: Help the AI Understand Your Project
CLAUDE.md is the most important customization mechanism in Claude Code. It’s a Markdown file you place in your project that gets automatically loaded every time a session starts — it’s like a “project briefing” you write in advance. Tech stack, code style, common gotchas: put everything here, and Claude won’t start from zero every time.
What Happens Without It
Without CLAUDE.md, you have to re-explain the project context to Claude at the start of every new session. Things like “we’re using Tailwind v4, not v3,” “commit messages should be in English,” “don’t add emojis” — fine to say once or twice, but after ten times it’s exhausting. Worse, Claude might use outdated API patterns, create files in the wrong place, or generate code that completely clashes with the project’s style. CLAUDE.md solves this — write it once, and it gets applied automatically every time.
The Hierarchy
CLAUDE.md isn’t limited to the project root — it supports a layered structure from global to local:
| Level | Path | Purpose |
|---|---|---|
| Global | ~/.claude/CLAUDE.md | Personal preferences, applies to all projects |
| Project | ./CLAUDE.md | Team-shared rules, committed to git |
| Local | ./CLAUDE.local.md | Personal project settings, added to .gitignore |
When Claude starts, it walks up from the working directory loading each CLAUDE.md it finds. More specific levels are loaded later, so local rules can override global ones. CLAUDE.md files in subdirectories get loaded dynamically when Claude reads files in that directory — they’re not all pulled in at startup.
What I Put in Mine
For my own projects, CLAUDE.md typically covers:
- Tech stack: Framework versions, styling approach, UI component library — so Claude’s generated code matches the project
- Common commands: Things like
npm run dev,npm run build— so Claude doesn’t have to guess when it needs to run something - Project structure: Which folder holds what — so Claude doesn’t create files in the wrong place
- Writing style: If the project has content output (like my articles section), tone, vocabulary, and format rules can all be defined here
- Commit conventions: Which prefixes to use, English vs. Chinese, whether to add Co-Authored-By
- Gotcha list: Easily confused settings, unusual style behaviors, files that shouldn’t be touched
CLAUDE.md (excerpt)
## Tech Stack

- **Framework**: Astro 5 (SSG) + React (interactive components)
- **Styles**: Tailwind CSS v4 (via @tailwindcss/vite integration)
- **Deployment**: Cloudflare Pages

## Notes

- Inline code on toolbox pages uses code style (gray background, red text);
  on other pages it uses highlight style (theme-colored underline)
- H2 sections get split into individual cards by JS — each H2 is one card
- Image quality set to 90 (astro.config.mjs)
Keys to Writing a Good CLAUDE.md
- Only write what Claude tends to get wrong: You don’t need to paste in the whole tech docs. Focus on the things Claude can’t intuit or commonly mixes up. Claude can reliably execute about 150–200 instructions at once, and system prompts use roughly 50. Every line you add is competing with others for attention — keep each CLAUDE.md under 200 lines
- Rules should be specific and verifiable: “Write it better” is useless; “use ‘and’ not ’&’, no emojis” actually works
- Update it as things change: Projects evolve and CLAUDE.md needs to evolve with them. Stale rules are more dangerous than no rules. My rule of thumb: if I catch myself correcting Claude on the same thing twice, it goes into CLAUDE.md
- Use imports: If you have too many rules, use
@path/to/filesyntax to import other files, or split details into a.claude/rules/directory. You can also usepathsfrontmatter to limit which file paths trigger a rule to load
A Recommended Global Guideline: Four Principles
If you’re not sure what to put in your global ~/.claude/CLAUDE.md, start with these four principles. They come from andrej-karpathy-skills, distilled from Andrej Karpathy’s observations on common LLM coding pitfalls:
- Think Before Coding: State your assumptions, surface tradeoffs, and stop to ask when something’s ambiguous — no silent guesses
- Simplicity First: Write the minimum code that solves the problem; no abstractions, configurability, or guards that weren’t requested
- Surgical Changes: Touch only what you must — don’t “improve” adjacent code along the way; every changed line should trace back to the request
- Goal-Driven Execution: Turn tasks into verifiable success criteria (write the test first, then make it pass) so the model can loop on its own until it’s done
In practice I keep the full content in a separate ~/.claude/dev-guidelines.md and have ~/.claude/CLAUDE.md point to it with a single line — so the guidelines only load when the task is recognized as development work, and non-dev contexts (writing, design, research) aren’t affected.
Everyday Prompting Tips
CLAUDE.md handles the “background knowledge that doesn’t change.” What actually determines efficiency day-to-day is prompt quality. The same request, written well versus sloppily, can mean the difference between 10 minutes and two hours. Here are a few principles I’ve actually found effective.
Think First, Then Type
Most people’s first instinct when they get Claude Code is to start typing — but that’s often the biggest mistake. The right approach is to enter Plan Mode first, think through the architecture and implementation direction, and then start. Five minutes of planning can save hours of debugging later.
Specific Over Vague
Vague instructions give Claude too much room to improvise, and the results usually aren’t what you wanted. Compare these two prompts:
❌ Build me an authentication system

✅ Using the existing User Model, build Email/Password authentication,
   store sessions in Redis with a 24-hour expiry,
   and add middleware to protect all routes under /api/protected
Explain the Why, Not Just the What
When you give Claude the reason behind an instruction, the results are noticeably better. “Use TypeScript strict mode” is fine, but “Use TypeScript strict mode because we’ve had production bugs from implicit any types” is better. The reason helps Claude make better judgment calls in situations you didn’t anticipate.
Tell It What Not to Do
Claude has a tendency to over-engineer — it readily adds extra files and unnecessary abstraction layers. If you want a simple implementation, say so explicitly: “Keep it simple, don’t add abstractions I didn’t ask for, try to fit everything in a single file.”
Manage the Context Window
Model quality in the context window starts degrading around 30% used, not 100%. A few practical approaches:
- One task per conversation: Don’t build a feature and refactor the database in the same session
- Use external memory: Have Claude write plans and progress to actual files (like SCRATCHPAD.md) — these persist across conversations
- Clear and restart when needed: If the conversation has gone off track or accumulated too much irrelevant content, just
/clearand start fresh. Forcing it to continue makes things worse
When You’re Stuck, Try a Different Angle
If you’ve explained something three times and Claude still doesn’t get it, explaining it again won’t help. Instead:
- Clear the conversation and retry with a fresh context
- Break the complex task into smaller steps
- Write a minimal example yourself and have Claude follow the pattern
- Rephrase the problem from a different angle
Featured Skills: One Command to Handle Repetitive Work
Skills are Claude Code’s custom command system. You write a complete set of instructions as a Markdown file, and afterward just type /skill-name in a conversation to trigger it in one shot. Instead of explaining “help me commit and push” or “help me review the code I just changed” every time, Skills compress all that communication overhead into a single command.
When to Package Something as a Skill
Not every operation is worth making into a Skill. Before covering specific Skills, here’s my criteria for deciding:
- High repetition: Something I do every day or every few days
- Fixed steps: The flow is nearly identical each time, with little need for situational adjustment
- High communication overhead: Without a Skill, I’d have to type a long explanation to Claude each time
Conversely, if an operation varies a lot each time, requires a lot of judgment and discussion, then talking to Claude directly is more effective — forcing it into a Skill only constrains you.
How to Create a Skill
Each Skill is a Markdown file placed at ~/.claude/skills/{skill-name}/SKILL.md (global) or .claude/skills/{skill-name}/SKILL.md (project level). The file uses frontmatter to define the name and description; the body is the instructions for Claude.
~/.claude/skills/my-skill/SKILL.md
---
name: my-skill
description: One-sentence description of what this skill does
---

# Skill Title

## Instructions

The steps you want Claude to execute...
Skills also support some advanced features: accepting arguments with $ARGUMENTS (like /fix-issue 123), injecting shell command output dynamically at load time with !`command`, and running in an isolated subagent with context: fork to avoid polluting the main conversation. For most situations though, the basic structure is plenty.
Development Skills
/commit-generate: Auto-generate commits and push
This is the Skill I use most. After finishing a code change, I just type /commit-generate. It automatically reads the staged changes, determines the commit type (feat / fix / refactor, etc.), generates an English commit message, and pushes to remote.
The whole flow — no need to think of a commit message, no manual push — is particularly great for the rhythm of making small changes and committing quickly.
~/.claude/skills/commit-generate/SKILL.md (excerpt)
## Instructions

1. **Read staged changes**
   - Run `git status` to check the current state
   - Run `git diff --cached` to see staged changes

2. **Generate commit message following these rules**
   - feat: New features or functionality
   - fix: Bug fixes or issue resolution
   - refactor: Code refactoring (no functionality change)
   - Write message in English, use present tense
   - Focus on WHAT and WHY, not HOW

3. **Create the commit and push to remote**
/simplify: A second pair of eyes after you’re done writing
After finishing a complex piece of logic, use /simplify to have Claude review the code you just changed. It spins up three agents scanning simultaneously, checking for reusable logic, unnecessary abstractions, and obvious performance issues, then fixes them directly.
When you’re writing, it’s easy to get stuck in local thinking. Having Claude scan with a global view regularly catches things you didn’t notice yourself. This Skill is built into Claude Code — no need to write it yourself.
/frontend-design: Generate polished frontend interfaces
When you need to quickly put together a page or component, /frontend-design can generate frontend code with real design quality. Compared to just telling Claude “make me a login page,” this Skill has a built-in set of design principles and quality standards, so the output actually looks considered rather than generic AI output. This is installed via a Plugin — enable it in settings and you’re ready.
Awesome DESIGN.md: Getting AI to produce presentable UI
This isn’t strictly a Skill, but it pairs really well with /frontend-design.

Awesome DESIGN.md is a community-curated collection of design system documents — 58 of them from well-known sites. It includes products like Linear, Vercel, Stripe, and Notion, all recognized for their design quality.
The concept is simple: write a website’s design system in Markdown that AI can read, covering nine dimensions including color, typography, component styles, spacing systems, and responsive breakpoints. Drop a site’s DESIGN.md into your project root, tell Claude “build this in this style,” and it can generate UI that’s consistent with that design system instead of defaulting to a generic look every time.
I reference Linear’s and Vercel’s DESIGN.md most often — that clean, minimal design language works well for developer tool interfaces.
/batch: Large-scale parallel edits
When you need to make sweeping changes across an entire codebase (like migrating all components from one framework to another), /batch uses git worktrees to open multiple independent work environments and process different files in parallel. This Skill is best for situations where “the scope is large but the change for each file is similar” — things like renames, API migrations, or bulk TypeScript type additions.
Documentation Skills
/codeck: Turn a folder into a presentation

If you have a pile of notes, documents, data, or images and want to quickly organize them into a structured presentation, Codeck can do it in one shot. It analyzes the materials in a folder you specify, automatically generates a complete HTML presentation file with keyboard navigation, fullscreen mode, speaker note timers, and even PDF and PPTX export.
Installation:
npx skills add hiyeshu/codeckOnce installed, the full flow works like this: type /codeck to have it analyze the materials, then /codeck-outline to organize the outline, /codeck-design to generate the visual design, and finally /codeck-export to export the finished product. Each step is an independent Skill, so you can pause at any point to make manual adjustments.
What’s distinctive about it is that the design logic isn’t template-based — it “maps” content structure to visual form. If an argument has three layers, it presents with a three-part visual rhythm. The output slides have noticeably more character than typical AI-generated decks.
Finding More Skills
What I’ve covered here is just the surface. The community has been building and sharing useful Skills, and if you want inspiration or something to install directly, check out these resources:
| Resource | Description |
|---|---|
| Awesome Claude Code | Community-curated list covering Skills, Hooks, Plugins, and tutorials |
| Awesome Claude Skills | A curated list focused specifically on Skills |
| Claude Code Plugins Marketplace | Community marketplace with ratings and install counts to help you evaluate options |
Most community Skills install by copying the file to ~/.claude/skills/ — same structure as what I described above. When picking one, I’d recommend reading the SKILL.md content first to confirm the instruction logic fits your needs before installing.
Official Multi-Account Switching: Use CLAUDE_CONFIG_DIR
If, like me, you have two Claude subscriptions — one main, one backup, ready to step in when the weekly limit runs out — I now recommend using the officially supported CLAUDE_CONFIG_DIR instead of only switching settings.json.
This section only covers Claude Code’s officially supported config-directory switching. If you also need to manage multiple Claude Code and Codex accounts, usage limits, and auto-switching, I wrote the full workflow in my multi-account Claude and Codex setup.
CLAUDE_CONFIG_DIR tells Claude Code which configuration directory to read. The default is ~/.claude, but you can create a separate directory for your backup account, such as ~/.claude-back. That keeps settings, login state, session history, and plugins separate from your main account. No logging out of the main account, no manual JSON edits.
The simplest setup is to add an alias function to ~/.zshrc:
~/.zshrc
claude-back() {
  mkdir -p "$HOME/.claude-back"
  CLAUDE_CONFIG_DIR="$HOME/.claude-back" claude "$@"
}
Then reload your shell:
source ~/.zshrcAfter that, launch the backup account with:
claude-backThe first time you enter this config space, run /login inside Claude Code and sign in with the backup account. After that, claude still uses the original ~/.claude, while claude-back always uses ~/.claude-back.
If you prefer naming both accounts explicitly, use this instead:
claude-main() {
  CLAUDE_CONFIG_DIR="$HOME/.claude" claude "$@"
}

claude-back() {
  mkdir -p "$HOME/.claude-back"
  CLAUDE_CONFIG_DIR="$HOME/.claude-back" claude "$@"
}~/.claude-back/settings.json can point to the same script, for example "command": "bash ~/.claude/statusline.sh". That lets one script serve both accounts while each account keeps its own settings and login state.Amphetamine: Keep It Running When You Step Away
Strictly speaking this isn’t a Claude Code feature, but it fills in a gap that’s easy to overlook — your computer going to sleep.
Claude Code sometimes runs really long tasks: large refactors, batch edits across the entire codebase, full test and build cycles — easily 10–20 minutes at a time. You might step away for a meeting, lunch, or even a quick nap during that window, but the moment your Mac goes to sleep, Claude Code stops with it. When you come back, it can only pick up from a checkpoint and the continuity of the task is broken.
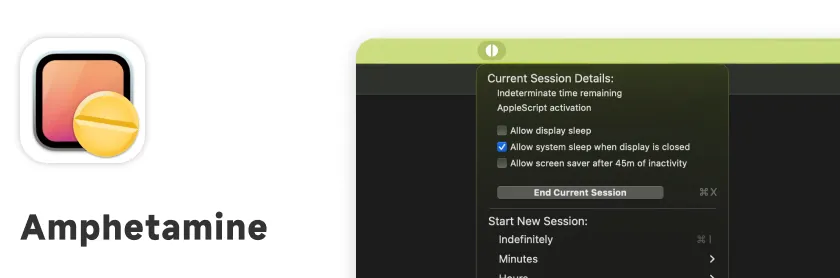
Amphetamine is the little utility that solves this. One click keeps your Mac awake, another click turns prevention off — both reliable, I’ve used it for a while without it ever flaking out. It also has Raycast integration, and I personally bind a hotkey: flip it on right before kicking off a long task, flip it off when the task finishes, never have to open the app UI.
Free App Store